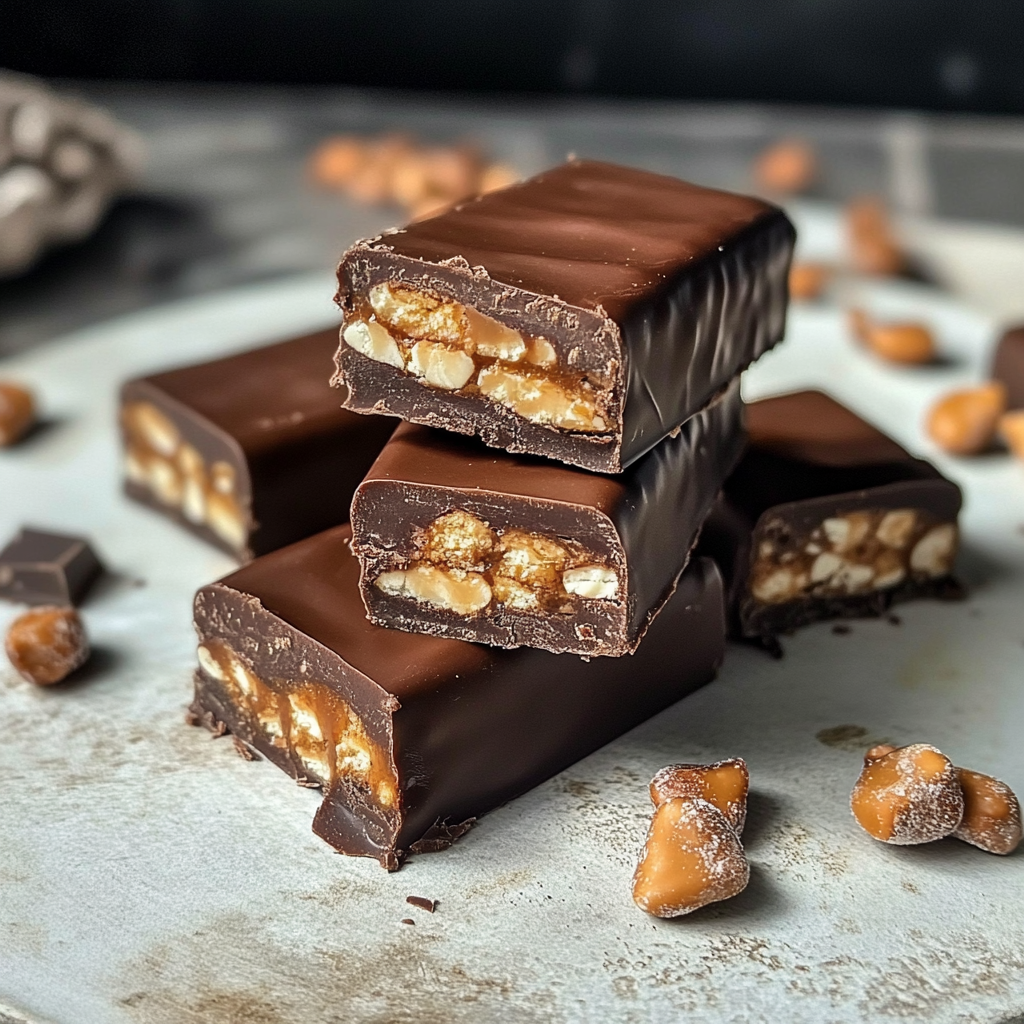
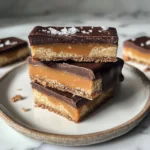
Healthy Twix Bars (Gluten-free) Homemade Recipe
Satisfy your sweet tooth with these Healthy Twix Bars (Gluten-free) Homemade Recipe! These delicious bars are made with wholesome ingredients, making them a perfect treat for any occasion. Whether you’re looking for a sweet snack to enjoy after dinner or a delightful dessert for a gathering, these bars are sure to impress. They combine the rich flavors of peanut butter and chocolate while remaining gluten-free, ensuring everyone can indulge without worry.
Why You’ll Love This Recipe
- Delicious Flavor: The combination of creamy peanut butter, chocolate, and a hint of maple syrup creates an irresistible taste.
- Nutritious Ingredients: Made with almond flour and natural sweeteners, these bars are a healthier alternative to traditional treats.
- Easy to Make: With simple steps and readily available ingredients, you can whip up these bars in no time.
- Customizable: Feel free to add nuts or dried fruits for extra texture and flavor.
- Perfect for Meal Prep: Make a batch in advance and enjoy them throughout the week as a snack or dessert.
Tools and Preparation
To make these Healthy Twix Bars efficiently, having the right tools on hand is essential. Below is a list of essential equipment that will help streamline your baking process.
Essential Tools and Equipment
- Baking pan (8×8 inch)
- Parchment paper
- Mixing bowls
- Rubber spatula
- Measuring cups and spoons
- Microwave-safe bowl or double boiler
Importance of Each Tool
- Baking pan: A sturdy baking pan ensures even cooking and easy removal of your bars.
- Parchment paper: Lining the pan with parchment paper prevents sticking and makes cleanup hassle-free.
- Mixing bowls: Different sizes allow for better organization while preparing various components of the recipe.

Ingredients
Satisfy your sweet tooth with these Healthy Homemade Twix Bars! Gluten-free and made with wholesome ingredients.
For the Shortbread Base
- 1 1/2 cups Almond Flour
- 3 tbsp Butter (melted)
- 1 1/2 tbsp Maple Syrup
- 1/2 tsp Vanilla Extract
- 1/4 tsp Salt
For the Caramel Filling
- 1 cup Creamy Peanut Butter
- 1/3 cup Maple Syrup
- 1 tsp Vanilla Extract
- 1/4 cup Almond Flour
For the Chocolate Coating
- 1 cup Chocolate Chips
- 1 1/2 tbsp Coconut Oil
How to Make Healthy Twix Bars (Gluten-free) Homemade Recipe
Step 1: Preheat the Oven
Preheat your oven to 350°F (175°C). Line an 8×8 inch baking pan with parchment paper, ensuring the edges are well covered. This step is crucial for easy removal of the shortbread base later.
Step 2: Prepare the Shortbread
In a large mixing bowl, combine the almond flour, melted butter, maple syrup, vanilla extract, and salt. Stir until fully incorporated into a dough.
– Press this mixture firmly into the prepared baking pan.
– Bake for 10-12 minutes or until golden brown around the edges.
– Set aside to cool while preparing the caramel filling.
Step 3: Make the Caramel Filling
In a medium bowl, mix together the peanut butter, maple syrup, vanilla extract, and almond flour until smooth.
– Once cooled, spread this caramel mixture evenly over the shortbread base.
– Place in the freezer for at least 1 hour to set.
Step 4: Prepare the Chocolate Coating
After setting, melt chocolate chips and coconut oil together using one of two methods:
– In a shallow bowl over boiling water (double boiler method).
– In a microwave-safe bowl in 30-second intervals, stirring until smooth.
Step 5: Assemble the Bars
Remove from freezer and lift out using parchment paper. Place on cutting board.
– Slice into 16 bars by cutting in half once and then slicing each half into eight even pieces.
Step 6: Coat the Bars
Dip each bar into melted chocolate fully covering it.
– Tap off excess chocolate gently before placing on parchment-lined tray.
– Repeat for all bars.
Step 7: Final Touch
Optionally drizzle remaining melted chocolate over bars and sprinkle with flaky sea salt. Return tray to freezer for about 10 minutes or until chocolate hardens.
Step 8: Enjoy!
These homemade healthy Twix bars are ready to be enjoyed. Store leftovers in an air-tight container in fridge or freezer.
How to Serve Healthy Twix Bars (Gluten-free) Homemade Recipe
These Healthy Twix Bars are perfect for satisfying your sweet cravings without the guilt. Here are some creative serving suggestions to enhance your enjoyment of these delicious treats.
Pair with Fresh Fruit
- Strawberries: Their juicy sweetness complements the rich chocolate and nutty flavors of the bars.
- Bananas: Sliced bananas provide a creamy texture that pairs well with the crunchy layers of the Twix bars.
Accompany with Nut Butters
- Almond Butter: Spread a thin layer on top for an extra nutty flavor boost.
- Cashew Butter: Its rich and creamy consistency makes a delightful addition alongside your bars.
Serve with a Dairy-Free Beverage
- Almond Milk: A refreshing drink that enhances the overall flavor experience.
- Coconut Milk: Its subtle sweetness pairs nicely with the chocolate and caramel notes of the bars.
Garnish with Whipped Coconut Cream
- Fluffy Topping: Adding a dollop of whipped coconut cream on top provides a light and airy contrast to the dense bars.
How to Perfect Healthy Twix Bars (Gluten-free) Homemade Recipe
Creating the perfect Healthy Twix Bars requires attention to detail. Here are some tips to ensure your bars turn out delicious every time.
- Use fresh ingredients: Ensure that your almond flour, nut butter, and chocolate chips are fresh for optimal flavor.
- Press firmly: When forming the shortbread base, pressing it firmly into the baking pan helps create a sturdy layer that holds together well.
- Cool completely: Allow each layer to cool thoroughly before adding the next. This prevents melting and ensures clean layers.
- Melt chocolate carefully: Whether using a microwave or stovetop, melt your chocolate slowly to prevent burning and achieve a smooth coating.
- Experiment with toppings: Feel free to add nuts, seeds, or dried fruit on top of the chocolate for added texture and flavor variations.
Best Side Dishes for Healthy Twix Bars (Gluten-free) Homemade Recipe
Pairing side dishes can elevate your experience when enjoying Healthy Twix Bars. Here are some delightful options:
- Fruit Salad: A mix of seasonal fruits adds freshness and balances out the sweetness of the bars.
- Greek Yogurt Parfait: Layer yogurt with granola and berries for a nutritious treat that complements dessert.
- Chia Seed Pudding: This creamy pudding offers a healthy dose of fiber and omega-3s while being deliciously sweet.
- Trail Mix: Combine nuts, seeds, and dried fruits for a crunchy side that enhances your snack time experience.
- Granola Bites: These chewy snacks can be made gluten-free as well, providing an extra crunchy element when paired with the bars.
- Smoothie Bowl: A refreshing smoothie bowl topped with nuts or granola creates a satisfying dessert combination.
Common Mistakes to Avoid
Creating Healthy Twix Bars can be a delightful experience, but some common mistakes can lead to less-than-ideal results. Here are a few pitfalls to avoid.
- Skipping the Cooling Time: Not allowing the shortbread to cool can make the layers slide apart. Always let it cool completely before adding the caramel layer.
- Using Cold Ingredients: Cold ingredients, especially butter, can prevent proper mixing. Ensure your butter is melted and at room temperature for a smooth dough.
- Overmixing the Caramel Layer: Overmixing can create air bubbles, making it less dense and chewy. Mix just until combined for the best texture.
- Not Measuring Ingredients Accurately: Inaccurate measurements can lead to an imbalanced taste or texture. Use measuring cups and spoons for precision.
- Neglecting Parchment Paper: Failing to line your baking pan with parchment paper can result in difficulty removing the bars. Always line the pan for easy removal.
- Forgetting to Freeze Before Cutting: Cutting too soon can cause the bars to fall apart. Freezing allows them to firm up, making slicing easier.

Storage & Reheating Instructions
Refrigerator Storage
- Store in an airtight container for up to 1 week.
- Keep in a cool part of your fridge to maintain freshness.
Freezing Healthy Twix Bars (gluten-free) Homemade Recipe
- Freeze for up to 2 months in an airtight container.
- Separate layers with parchment paper to prevent sticking.
Reheating Healthy Twix Bars (gluten-free) Homemade Recipe
- Oven: Preheat to 350°F (175°C), place bars on a baking sheet for about 5 minutes until warm.
- Microwave: Heat each bar for 10-15 seconds; do not overheat as they may become too soft.
- Stovetop: Warm in a skillet over low heat for a minute or two, watching closely.
Frequently Asked Questions
If you have questions about these Healthy Twix Bars, we’ve got answers!
How do I make Healthy Twix Bars (gluten-free) without peanut butter?
You can substitute almond butter or sunflower seed butter for peanut butter in this recipe.
Can I use other flours instead of almond flour?
Yes! You can use coconut flour or gluten-free all-purpose flour, but adjustments may be needed for moisture content.
How do I ensure my chocolate coating is smooth?
Melt chocolate chips with coconut oil gently over low heat or in short intervals in the microwave, stirring frequently.
What is the best way to store leftovers?
Store them in an airtight container in the refrigerator or freezer depending on how soon you plan to consume them.
Final Thoughts
These Healthy Twix Bars are not only delicious but also versatile! With easy customization options like different nut butters or flavorings, you can make them your own. Try making this delightful treat today!
Healthy Twix Bars (Gluten-free) Homemade Recipe
Indulge in a guilt-free treat with these Healthy Twix Bars (Gluten-free) Homemade Recipe! These delectable bars are crafted with wholesome ingredients, offering a perfect fusion of creamy peanut butter and rich chocolate without compromising on health. Ideal for satisfying your sweet cravings after dinner or as a delightful dessert at gatherings, these bars are not only gluten-free but also easily customizable with nuts or dried fruits. With their simple preparation steps, you can whip up a batch in no time and enjoy them throughout the week!
- Prep Time: 20 minutes
- Cook Time: 12 minutes
- Total Time: 32 minutes
- Yield: Approximately 16 servings 1x
- Category: Dessert
- Method: Baking
- Cuisine: American
Ingredients
- 1 1/2 cups almond flour
- 3 tbsp melted butter
- 1 1/2 tbsp maple syrup
- 1/2 tsp vanilla extract
- 1/4 tsp salt
- 1 cup creamy peanut butter
- 1/3 cup maple syrup
- 1 tsp vanilla extract
- 1/4 cup almond flour
- 1 cup chocolate chips
- 1 1/2 tbsp coconut oil
Instructions
- Preheat your oven to 350°F (175°C) and line an 8×8 inch baking pan with parchment paper.
- In a mixing bowl, combine almond flour, melted butter, maple syrup, vanilla extract, and salt to form a dough. Press into the prepared pan and bake for 10-12 minutes until golden brown.
- In another bowl, mix together creamy peanut butter, maple syrup, vanilla extract, and almond flour for the caramel filling. Spread it over the cooled shortbread base and freeze for at least an hour.
- Melt chocolate chips with coconut oil using a double boiler or microwave until smooth. Dip each bar into the melted chocolate and place them on parchment paper. Optionally drizzle with remaining chocolate and sprinkle with flaky sea salt.
- Return to freezer for about 10 minutes until the chocolate hardens before slicing into bars.
Nutrition
- Serving Size: 1 serving
- Calories: 180
- Sugar: 6g
- Sodium: 40mg
- Fat: 12g
- Saturated Fat: 4g
- Unsaturated Fat: 8g
- Trans Fat: 0g
- Carbohydrates: 15g
- Fiber: 3g
- Protein: 5g
- Cholesterol: 10mg